
Plugins are the most common way of running custom code in the Microsoft Dynamics 365 CRM system. If you start working on an existing system, the company will often have a plugin solution already that you can work in. If not, you have to create one from scratch following this guide.
One plugin solution can contain any number of plugins.
It is also possible to have more than one plugin solution in a system, so you may want to have one plugin project where you do all you day to day development and another one for specific functionality.
To create a new plugin solution from scratch, you need to do 5 things:
- Create a Visual Studio solution to hold your plugin code
- Write the plugin code in Visual Studio
- Compile the plugin dll in Visual Studio
- Register the plugin dll in Microsoft Dynamics 365 CRM using a Plugin Registration tool
- Register one or more plugin steps in Microsoft Dynamics 365 CRM using a Plugin Registration tool
- Test your plugin
Step 1: Create a Visual Studio solution to hold your plugin code
Open your Visual Studio – It doesn’t matter much which version you use as long as it supports C# and .NET Framework 4.6.2.
OBSERVE: .NET Framework 4.6.2 is the highest framework supported by Microsoft Dynamics 365 CRM at the moment. Even if your Visual Studio allows you to select a higher framework, choosing that will not work in the CRM system. .NET Core is not supported either.
So choose “Create a new project” in Visual Studio, either from the start screen or using the menu. A small note: We assume that you know how Visual Studio works and is familiar with writing C# code. Teaching you that is outside the scope of this site which focuses specifically on Dynamics 365 CRM development.
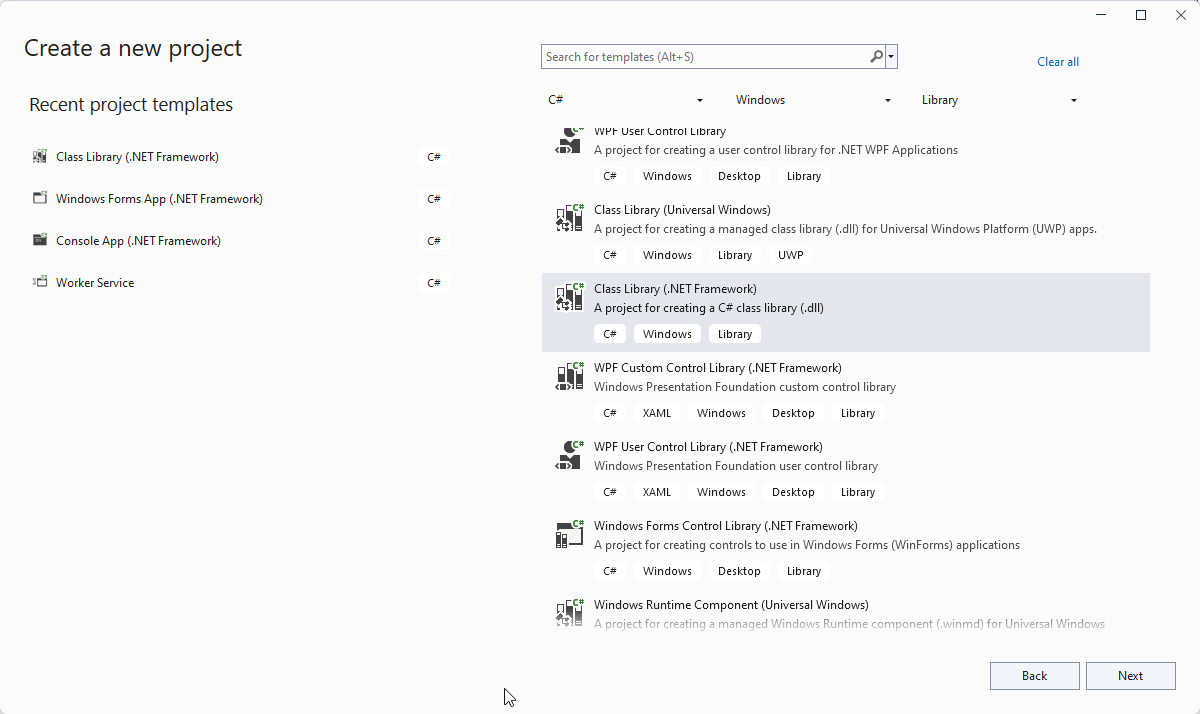
Choose “Class Library (.NET Framework)”
On the next screen, choose the name of your project and the location where you want to save your code. I have called it “MyFirstCRMPlugin”, but you will of course want to give it a more suitable name, right?
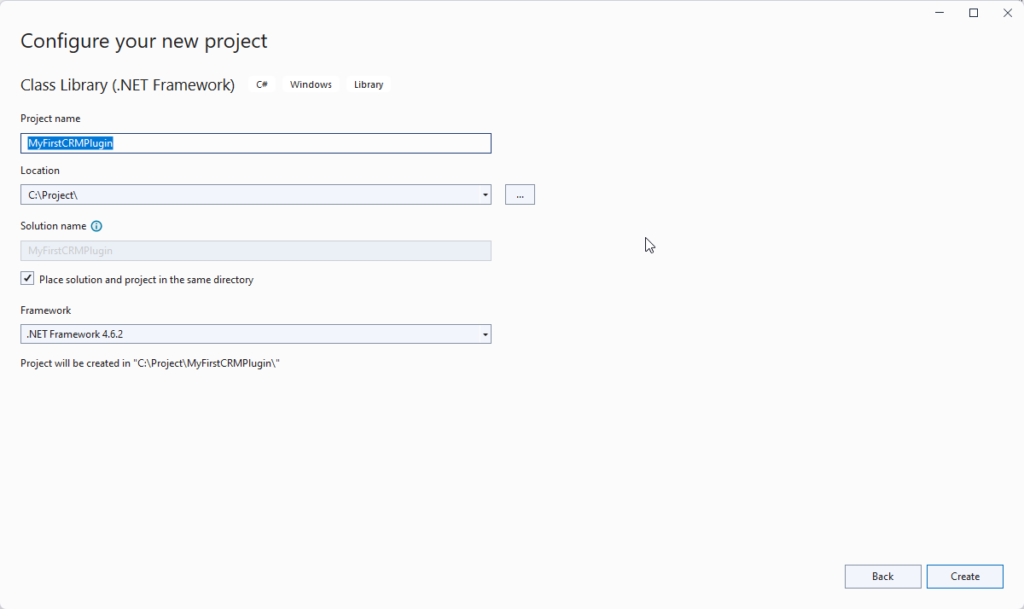
Make sure to select .NET Framework 4.6.2.
Once the project is created, it need to be signed, otherwise it will not be accepted by the CRM system. Right-click the project in the Solution Explorer and select “Properties”.
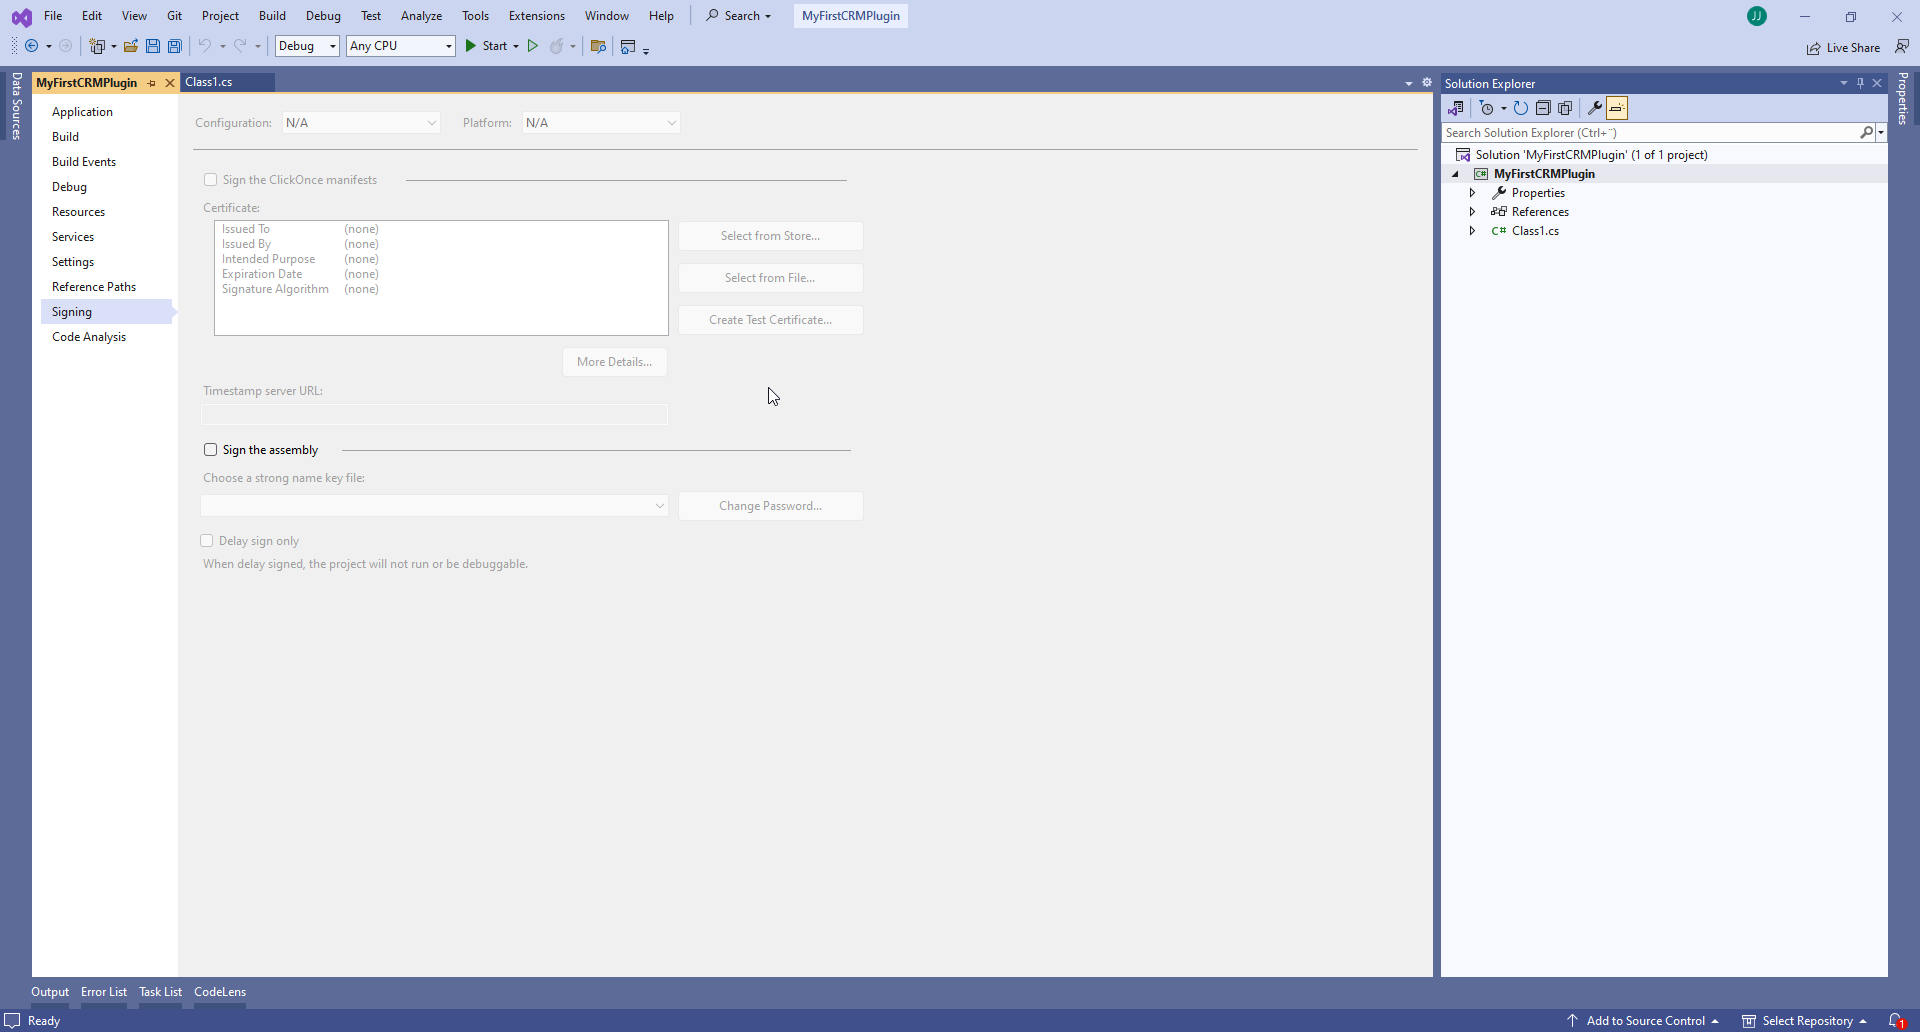
Choose the “Signing” tab and check the “Sign the assembly”. If you have a Strong Name Key file you want to use, select that, otherwise select “New” from the dropdown.
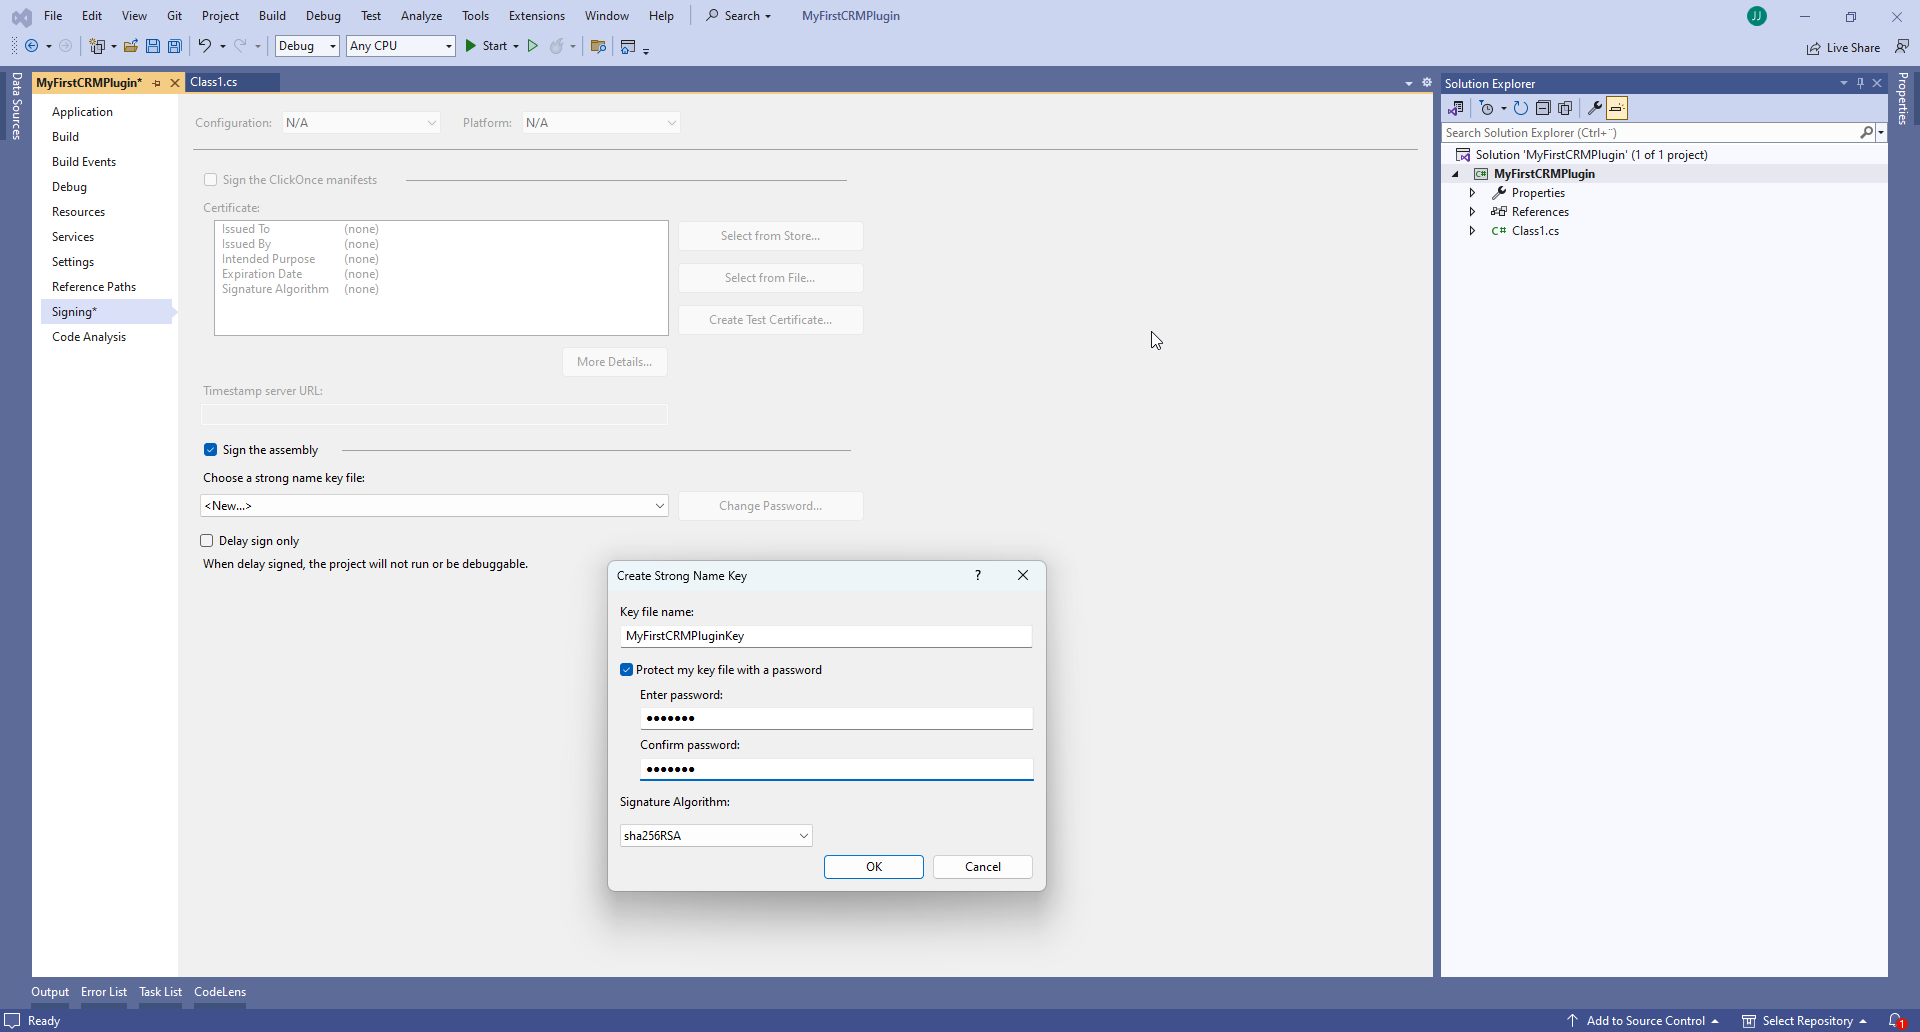
Give the Key file a name and enter a password. To be honest, I have never experienced that you ever need to enter that password anywhere again later, but better make a note of it somewhere where you can find it again, should the unexpected happen. Click “OK”
Now you need to add the Dynamics CRM development kit as a reference to the solution. The easiest way is to right-click the solution in the Solution Explorer and select “Manage Nuget packages…” from the menu.
Click the “Browse” tab and enter “Microsoft.CrmSdk” in the search box. Select “Microsoft.CrmSdk.CoreAssemblies” and click the “Install” button.
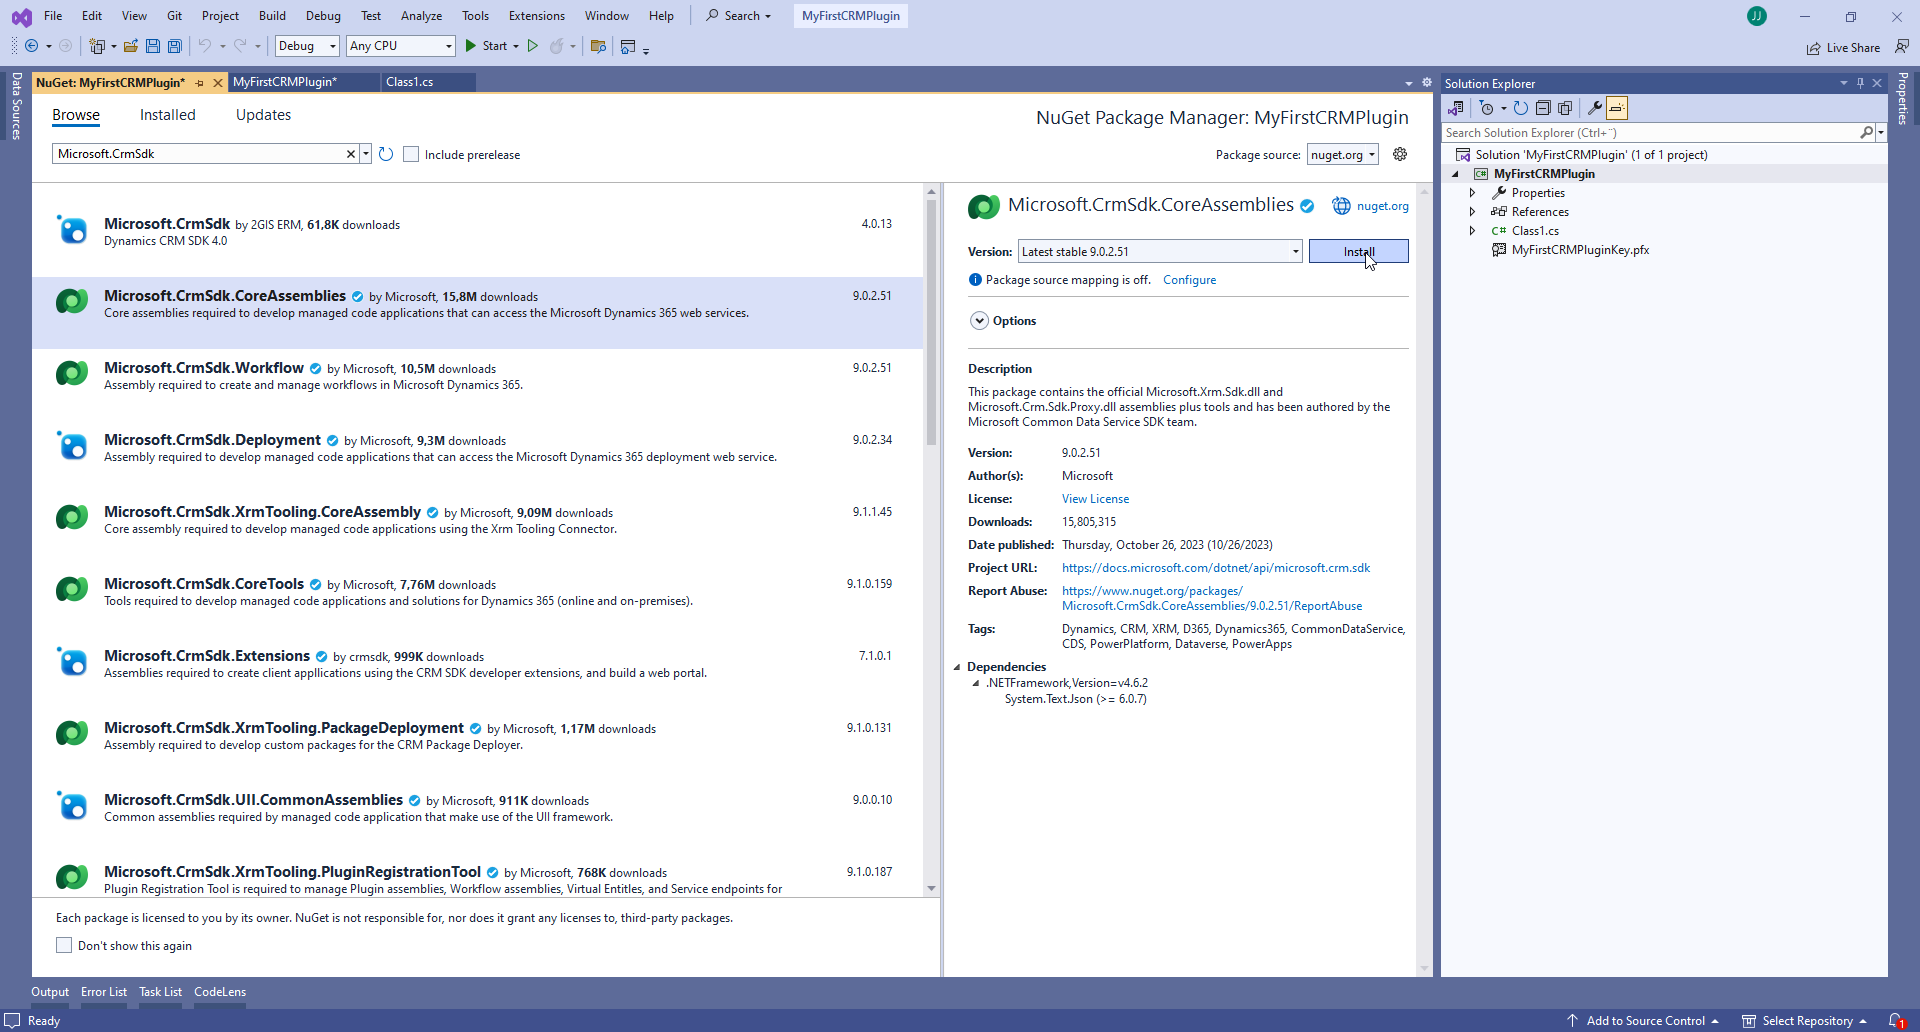
Click “Apply” on the next dialog.
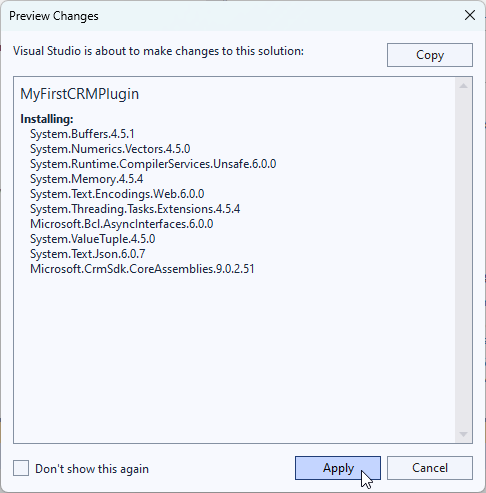
Click “I Accept” on the Microsoft license box and calmly wait while Nuget installs the assemblys needed for Dynamics 365 CRM development.
Your Visual Studio project is now ready for development.
Step 2: Write the plugin code in Visual Studio
So let’s write your first plugin. Open the “Class1.cs” file from the Solution Explorer.
Change “Class1.cs” in the solution explorer to e.g. “PreValidateAccountCreate.cs” and open the code window.
Changing the filename should have changed the code:
public class Class1
{
}
to:
public class PreValidateAccountCreate
{
}
If not, do it manually. Then we need to make our class implement the “IPlugin” interface:
public class PreValidateAccountCreate : IPlugin
{
}
For demo purposes, we are going to write a PreValidate plugin that executes on the Account entity Create step. More about that later. For now, we’ll just give the plugin a sensible name so it’s easy to locate the code when you need to.
The IPlugin implements only one method, “Execute”, so that needs to be added:
public class PreValidateAccountCreate: IPlugin
{
    public void Execute(IServiceProvider serviceProvider)
    {
    }
}
In the Execute method, you will need code to access the CRM system. It’s more or less the same for all plugins, but you may need to make small changes in certain cases. For now, you can copy and paste some basic code:
public class PreValidateAccountCreate: IPlugin
{
    public void Execute(IServiceProvider serviceProvider)
    {
        #region Initializion of context etc

        // Obtain the tracing service for plugin trace log.
        ITracingService tracingService = (ITracingService)serviceProvider.GetService(typeof(ITracingService));

        // Obtain the execution context from the service provider.
        IPluginExecutionContext context = (IPluginExecutionContext)serviceProvider.GetService(typeof(IPluginExecutionContext));

        // Obtain the organization service reference which you will need for
        // web service calls.
        IOrganizationServiceFactory serviceFactory = (IOrganizationServiceFactory)serviceProvider.GetService(typeof(IOrganizationServiceFactory));
        IOrganizationService service = serviceFactory.CreateOrganizationService(context.UserId);

        // Obtain the ServiceContext, which you will need for LINQ-queries with generated early bound entities
        var serviceContext = new OrganizationServiceContext(service);

        // Get record from form
        Entity record = (Entity)context.InputParameters["Target"];
        Entity preImageEntity = context.PreEntityImages.Contains("preImage") ? (Entity)context.PreEntityImages["preImage"] : null;
        Entity postImageEntity = context.PostEntityImages.Contains("postImage") ? (Entity)context.PostEntityImages["postImage"] : null;

        #endregion

        // Here goes the custom Plug-in business logic.
    }
}
If Visual Studio hasn’t added it automatically now, you will need to add some “using” clauses to your plugin class:
using Microsoft.Xrm.Sdk;
using Microsoft.Xrm.Sdk.Client;
using System;

namespace MyFirstCRMPlugin
{
    public class PreValidateAccountCreate: IPlugin
    {
        public void Execute(IServiceProvider serviceProvider)
        {
            #region Initializion of context etc

            // Obtain the tracing service for plugin trace log.
            ITracingService tracingService = (ITracingService)serviceProvider.GetService(typeof(ITracingService));

            // Obtain the execution context from the service provider.
            IPluginExecutionContext context = (IPluginExecutionContext)serviceProvider.GetService(typeof(IPluginExecutionContext));

            // Obtain the organization service reference which you will need for
            // web service calls.
            IOrganizationServiceFactory serviceFactory = (IOrganizationServiceFactory)serviceProvider.GetService(typeof(IOrganizationServiceFactory));
            IOrganizationService service = serviceFactory.CreateOrganizationService(context.UserId);

            // Obtain the ServiceContext, which you will need for LINQ-queries with generated early bound entities
            var serviceContext = new OrganizationServiceContext(service);

            // Get record from form
            Entity record = (Entity)context.InputParameters["Target"];
            Entity preImageEntity = context.PreEntityImages.Contains("preImage") ? (Entity)context.PreEntityImages["preImage"] : null;
            Entity postImageEntity = context.PostEntityImages.Contains("postImage") ? (Entity)context.PostEntityImages["postImage"] : null;

            #endregion

            // Here goes the custom Plug-in business logic.
        }
    }
}
This is a good start for writing your plugin code, so often, you will simply copy and paste all this from an existing plugin instead of going through each step as described above.
Last, but not least, we will add our own code at the bottom. For demo purposes, we will simply validate that the Account description is not “Test”:
public void Execute(IServiceProvider serviceProvider)
{
    #region Initializion of context etc

    // Obtain the tracing service for plugin trace log.
    ITracingService tracingService = (ITracingService)serviceProvider.GetService(typeof(ITracingService));

    // Obtain the execution context from the service provider.
    IPluginExecutionContext context = (IPluginExecutionContext)serviceProvider.GetService(typeof(IPluginExecutionContext));

    // Obtain the organization service reference which you will need for
    // web service calls.
    IOrganizationServiceFactory serviceFactory = (IOrganizationServiceFactory)serviceProvider.GetService(typeof(IOrganizationServiceFactory));
    IOrganizationService service = serviceFactory.CreateOrganizationService(context.UserId);

    // Obtain the ServiceContext, which you will need for LINQ-queries with generated early bound entities
    var serviceContext = new OrganizationServiceContext(service);

    // Get record from form
    Entity record = (Entity)context.InputParameters["Target"];
    Entity preImageEntity = context.PreEntityImages.Contains("preImage") ? (Entity)context.PreEntityImages["preImage"] : null;
    Entity postImageEntity = context.PostEntityImages.Contains("postImage") ? (Entity)context.PostEntityImages["postImage"] : null;

    #endregion

    // Here goes the custom Plug-in business logic.

    if (record.Attributes.Contains("description") &&
        record.Attributes["description"].ToString().Equals("Test", StringComparison.InvariantCultureIgnoreCase))
    {
        throw new InvalidPluginExecutionException("You can't have a description like that!");
    }
}
That’s quite useless code, but then again, this is only a demo.
Anyway: If you try to create a new Account in the system and write “Test” as the description, you will get an error. If the description is anything else, it will create the Account.
Observe that I cast an exception of the type InvalidPluginExecutionException. That is the only type of exception you should throw in a plugin. That will show the error message to the user in a user friendly way. Throwing a “normal” system Exception will open a much more complicated error dialog, first and foremost suited for error handling by developers.
You don’t need to create a new assembly for each plugin you write. Typically, you will probably want to put all of your plugins in the same assembly unless there are specific reasons for doing otherwise. That could be if you wish to separate large and complicated code connected to specific functionality for instance.
If that’s not the case, you simply create a new class for every plugin, name it as peer your naming convention and derive it from IPlugin as shown above.
Step 3: Compile the plugin dll in Visual Studio
Now that our plugin code is ready, you can build the project to create the plugin dll. You can leave the build setting as Debug, the build mode doesn’t really matter, so in my opinion, there’s no reason to mess around with Debug vs. Release mode. Also, AnyCPU will do just fine.
Once the build is done without errors, you can proceed and register the dll in your CRM system.
Step 4: Register the plugin dll in Microsoft Dynamics 365 CRM
To register your plugin dll in your CRM system, you need a Plugin Registration tool. You have several options for that, I mentioned it in the “What do I need to get started?” post.
I use the tool available in the XrmToolbox application.
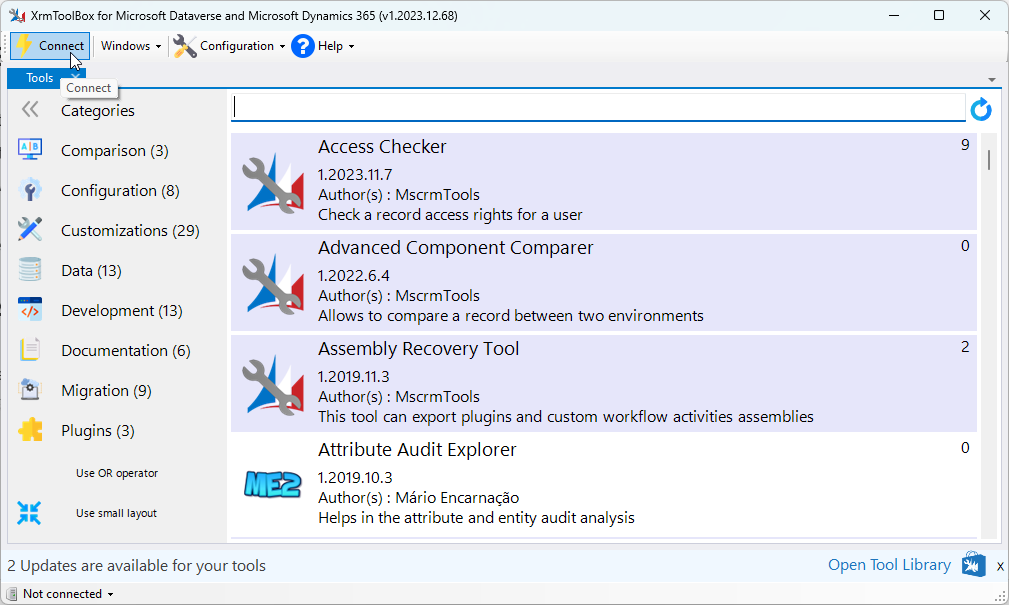
If it’s the first time you use the XrmToolbox, use the “Connect” button to define a connection to your CRM system. For the purpose of registering a plugin dll, you only need to create a connection to your development environment, but to use other tools in the toolbox at a later stage, it can be nice to have connections for your test and production environments as well.
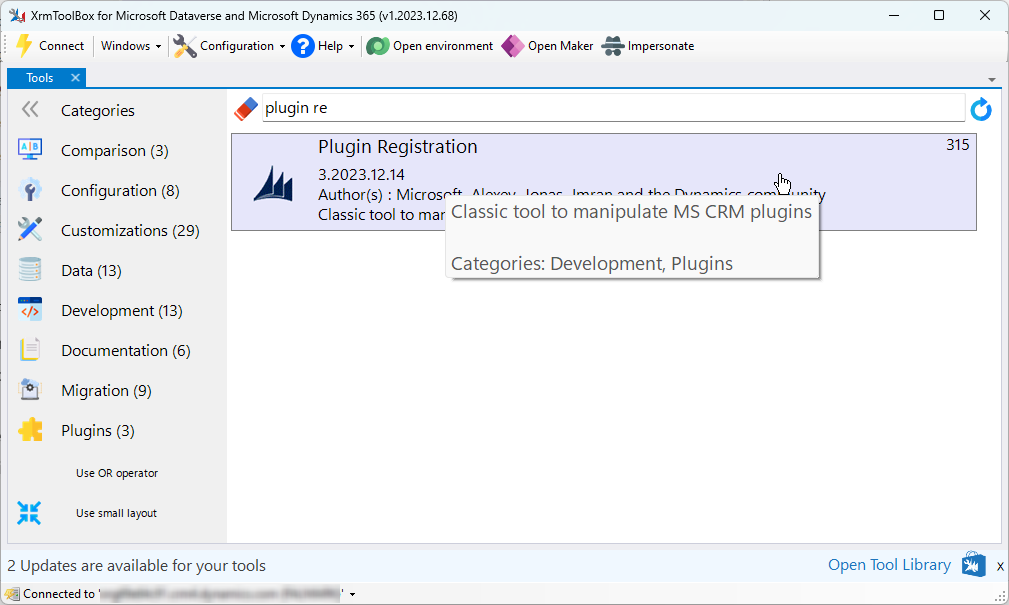
Once the program has connected to your CRM system, use the search box to locate the Plugin Registration tool. Click it to open it.
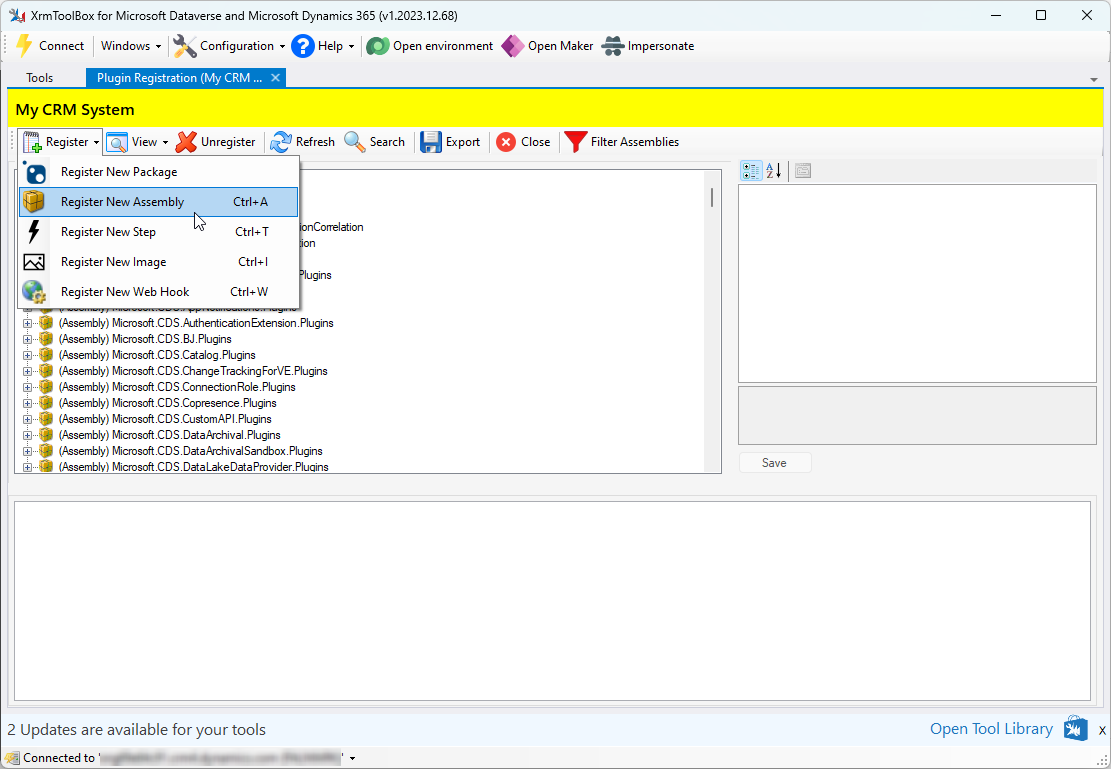
Click “Register” in the top menu and select “Register New Assembly”
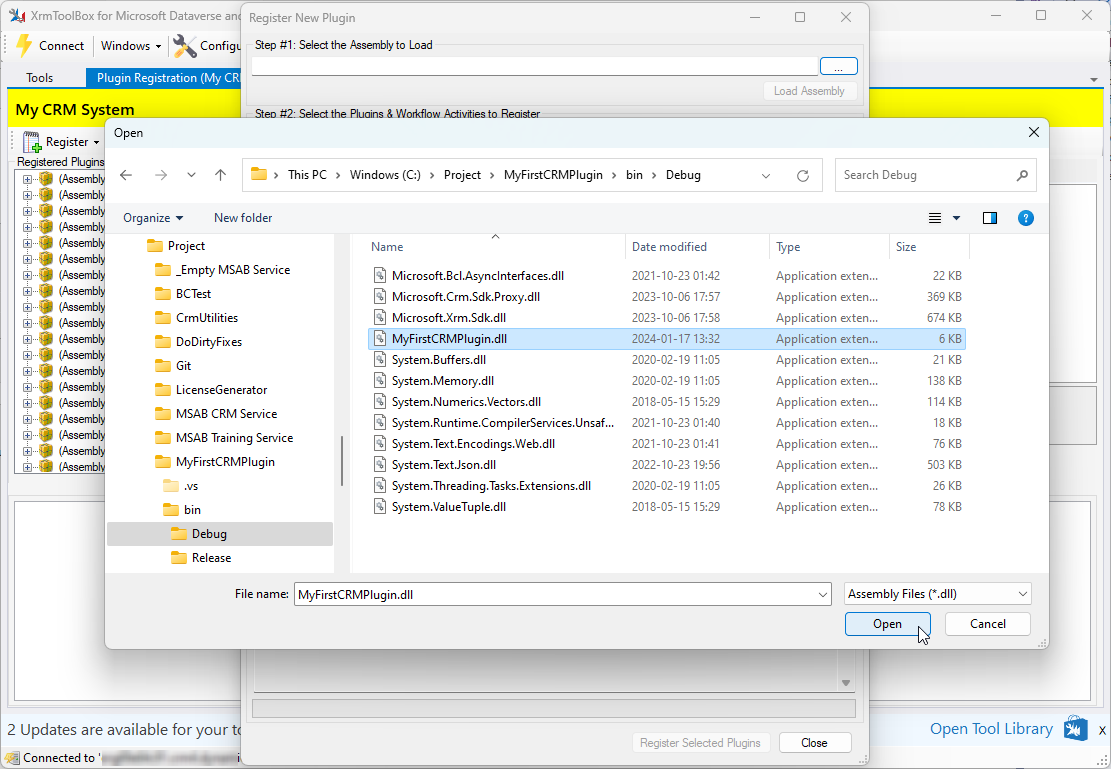
Use the browse button on the right side under “Step 1” to locate your plugin dll file in the Visual Studio build folder:
When you click open, the dll will be analyzed and all available plugins will be listed so that we can choose which ones we want to register. In our case, there is only one, so make sure that the PreValidateAccountCreate plugin is checked:
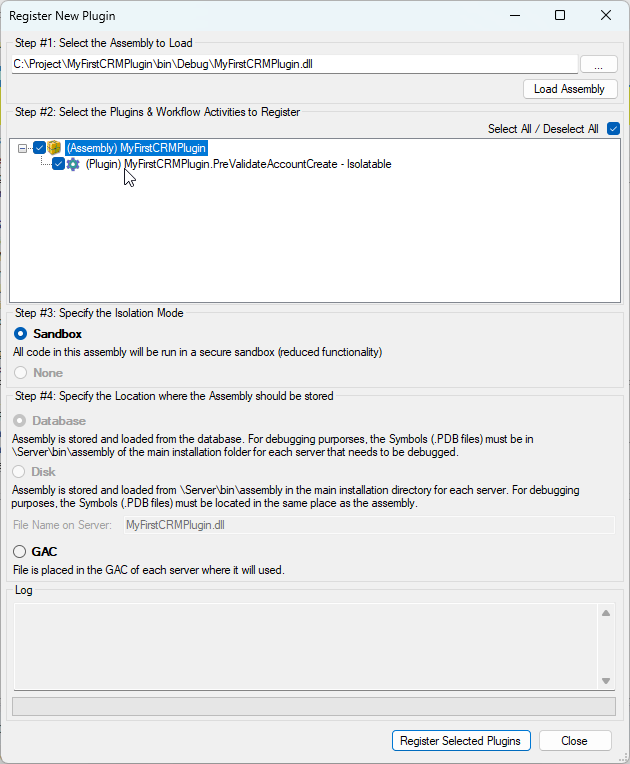
Leave Isolation mode as Sandbox and Location as Database. These settings should always be used even though it may be possible to select something else!
Click “Register Selected Plugins”.
You will now be able to see your plugin dll in the assembly list. It will probably be near the bottom of the list.
TIP: To make it easier to locate and access your plugin dll, you can click the “Filter Assemblies” button at the top and check “Hide Managed Assemblies”. That will hide most of Microsoft’s assemblies, which we don’t care about anyway.
Step 5: Register one or more plugin steps in Microsoft Dynamics 365 CRM
If you completed Step 4 above, the plugin assembly and your new plugin have been registered in your CRM system. The plugin is not being called yet, though, because you need to specify when the code should run. You do that by registering a Plugin Step on the plugin you just registered above.
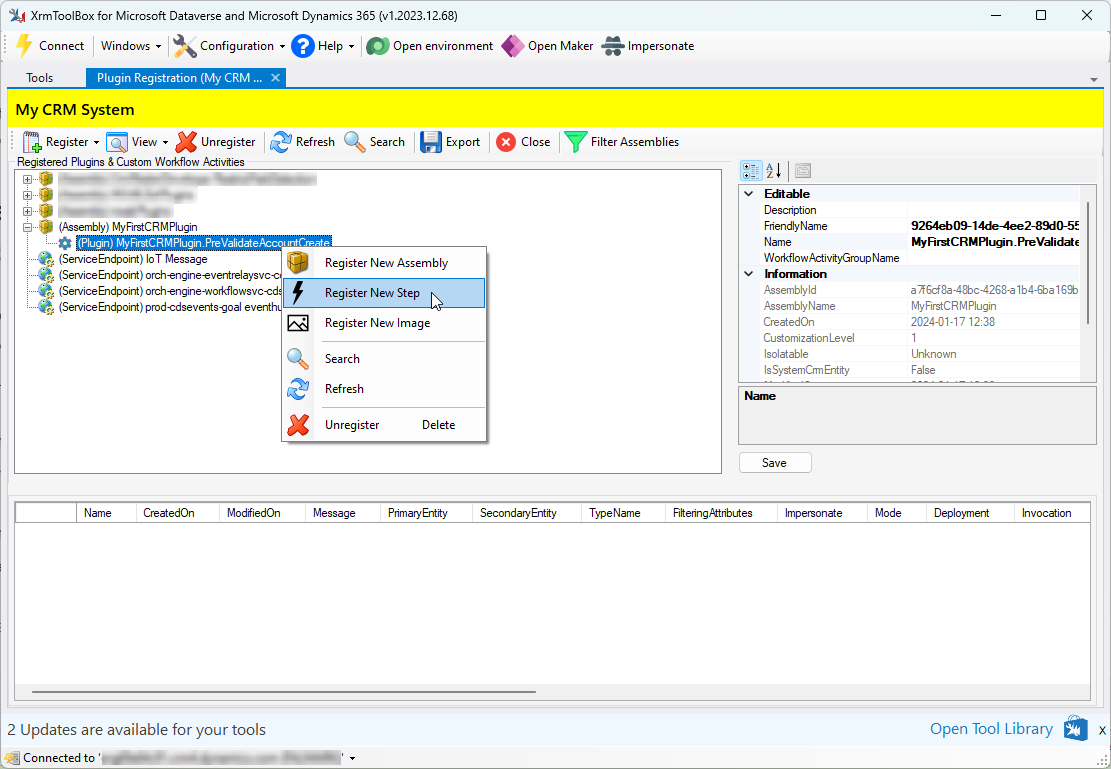
In the Plugin Registration too, expand your new Plugin assembly (MyFirstCRMPlugin) so that you can see your plugin (MyFirstCRMPlugin.PreValidateAccountCreate).
Right click the plugin and select “Register New Step” (Notice that I have hidden managed assemblies for easier overview):
On the “Register New Step” dialog, there’s a lot of settings that are good to know about, and you will learn as you go along. It’s outside the scope of this article to go through them all, so for now just change the settings marked in red:
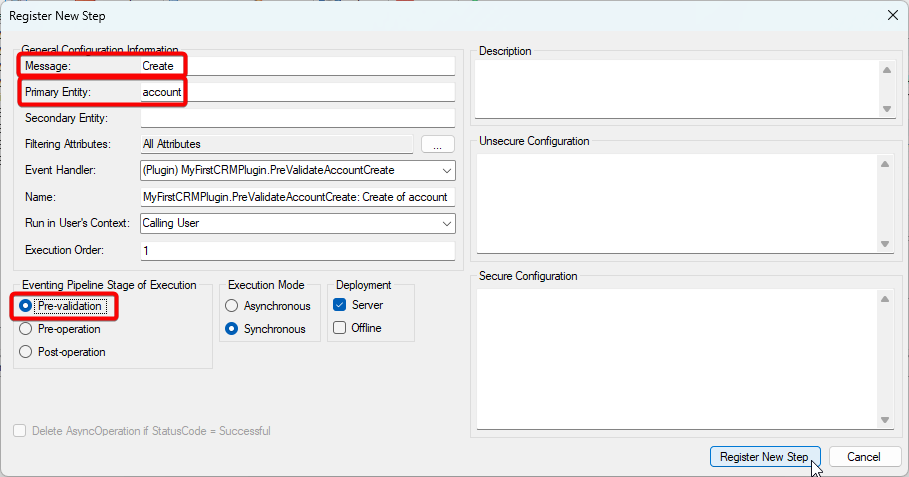
The first one, “Message” defines when the plugin should run. There are different events raised for the different entities. The most common to write code for is “Create” and “Update”, but you may want to write code on other events.
The second one, “Primary Entity” is the logical name of the entity you want to run your code on. The logical name is the internal system name. It will always be in small letters and singular. “Account” is a default system entity, and the logical name is “account”. For customized entities, the logical name can have a prefix, e.g. “new_mycustomentity” if it’s in the default solution or “crm_mycustomentity” if it’s in one of your own solutions that has the prefix defined as “crm”.
The last one defines when in the Create Account process the plugin should run. For now, just choose “Pre-validation” (because we called our plugin “PreValidateAccountCreate”)…
Click “Register New Step” to register the step
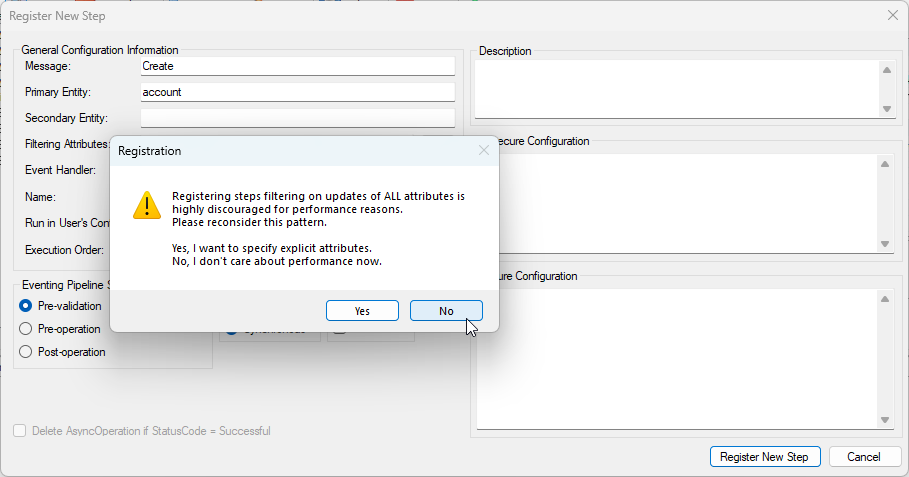
If you get this message, just press “No” for now:
OBSERVE: If you have your own CRM solution in which you keep your changes (which you SHOULD have to facilitate deployment of your customizations), you should add the assembly AND the plugin steps to your solution. I will explain more about that in a separate post!
Step 6: Test your plugin
Now that your new plugin has been registered, you need to test it of course.
Open your CRM system and go to Accounts. If you already HAD your system open before, you will need to press CTRL+F5 to refresh the cache and load your new plugin.
Click “New” to create a new Account.
Fill in all required fields.
Put the text “Test” in the Description field.
Click “Save”.
If you have done all of the above correctly, you should see this message:
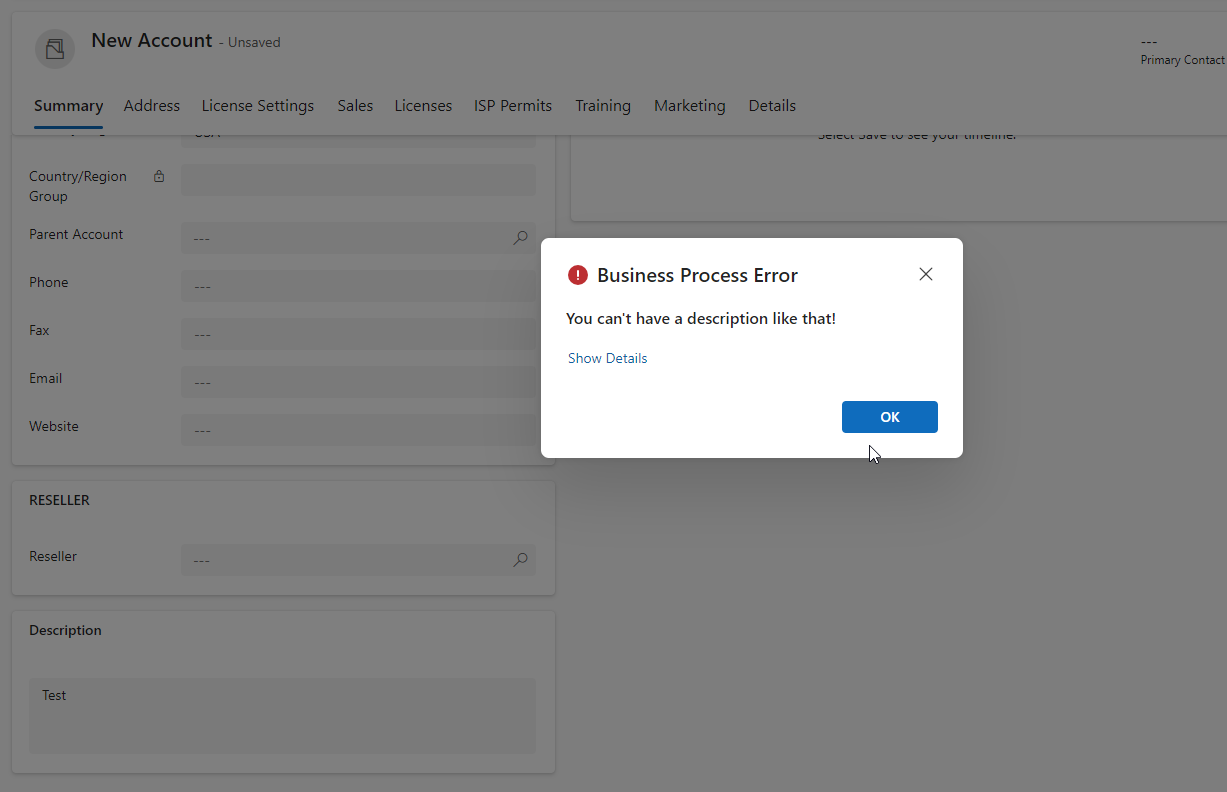
You have now created your first CRM plugin. There are a lot of things to learn and observe when it comes to plugins. It’s too much to write about it here, so I’ll try to add more posts about plugin creation later on.
Good luck!